Web Surveys
%201.svg) Email Surveys
Email Surveys%201.svg) SMS Surveys
SMS Surveys%201%20(1).svg) In-Product Feedback
In-Product Feedback%201.svg) In-App Feedback
In-App Feedback%201.svg) Offline Surveys
Offline Surveys


 Microsurveys
 Feedback Button
 In-App
 Email
Email SMS
SMS Embed Survey in Email
 In-Signature Survey
 API Triggers & Integrations
.svg) Android Survey App
Android Survey App.svg) iOS Survey App
iOS Survey App.svg) Kiosk Surveys
Kiosk Surveys.svg)
%201%20(1).svg)
.svg)

.svg)

 Salesforce
  HubSpot
 ActiveCampaign
 Pipedrive
 Mailchimp
 Zendesk
  Freshdesk
 HelpScout
  Front
Front Slack
Slack  MS Teams
 Webex
Webex Zoom
Zoom Google Sheets
  Zapier
  Integrately
 Webhooks
  Developer APIs


.jpeg)

Creating a survey is a powerful and effective approach for collecting data and opinions from your audience, whether you're seeking customer feedback, conducting research, or making important decisions. To ensure your survey delivers valuable insights, it's crucial to follow a structured approach.
With survey software like Zonka Feedback, creating a survey is a breeze. With ready-to-use templates, you can quickly and easily design a survey that suits your needs. And even creating fully customized surveys from scratch takes a few minutes.
Not only does Zonka Feedback provide a variety of survey templates, but it also offers a range of question types, survey logic options, multiple languages, and various other features to help you gather specific and detailed information from your respondents.
This article will take you through the steps of creating and customizing your survey in your Zonka Feedback account.
TL;DR
- Creating a survey can be an easy task when you have the right survey software at your hand.
- Zonka Feedback allows you to create surveys via two approaches- you can create a survey from scratch by choosing your question type, or you can simply select a ready-to-use template and distribute your survey in minutes to your target audience.
- This online survey tool comes with an easy-to-use WYSIWYG survey maker with complete customization options for white-labeling and branding your online surveys. You can also design your surveys based on the theme and survey look you want to create.
- When you create a survey with Zonka Feedback, you can also add logic, create & manage variables, add multiple languages, and manage entire survey settings on your own.
- Once you have created your survey, you can distribute it across multiple survey channels like emails, web, SMS, in-app, in-product, survey app, like iOS and Android Survey app, and more.
- It also offers an intuitive dashboard with advanced survey reports and analytics to help you decipher the responses, take required actions, and effectively close the feedback loop.
- You can sign up for a 14-day free trial or schedule a demo with our team to understand how to create a survey with Zonka Feedback and start collecting and measuring customer satisfaction to improve the overall experience.
Create your Surveys with Zonka Feedback
Collect and measure customer feedback to get a holistic view of your customer journey and improve the customer experience.

Steps to Create a Survey with Zonka Feedback
Creating a survey is an essential part of gathering valuable feedback from your customers or employees. With Zonka Feedback, you can easily create a survey that aligns with your objectives and captures the data you need. Here are the steps on how to create a survey with Zonka Feedback.
Step 1: Adding a New Survey
When you first sign up for your Zonka Feedback account, you’ll be directed to the dashboard, where you can manage your surveys and feedback forms.
There are two methods to create a survey. You can either select a template from the template library or opt to create a survey from scratch. Let’s explore both of these options.
a. How to Create a Survey with Templates
Zonka Feedback offers a range of templates tailored to various industries and purposes. Click on "Add Survey" and choose the template that best aligns with your objectives. Whether you're conducting customer satisfaction surveys or employee engagement assessments, Zonka Feedback has a template for you.
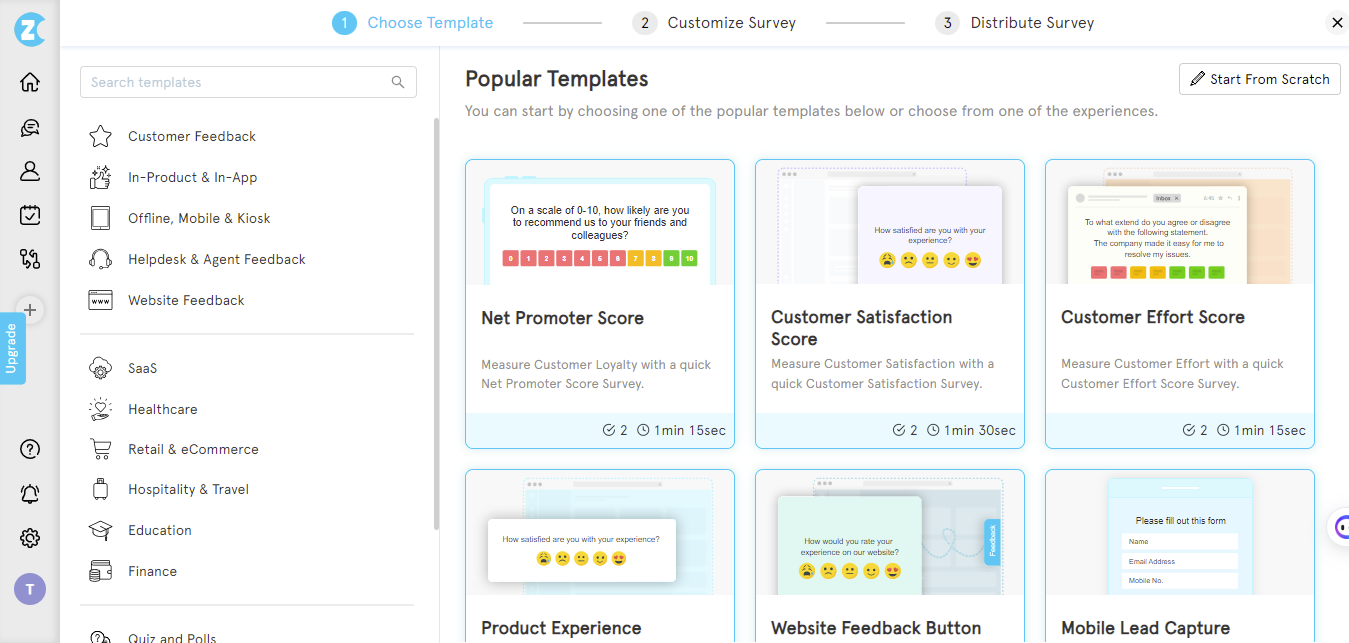
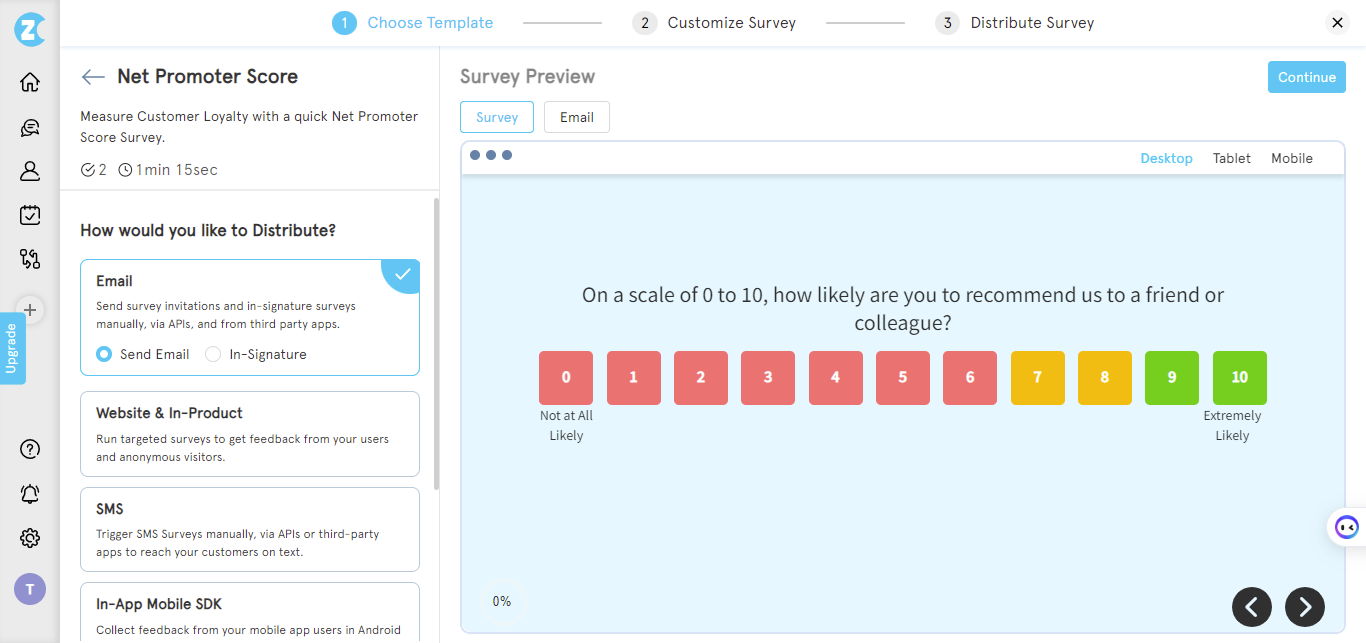
When you choose any of the templates available in the library, you will be redirected to the chosen template. You can preview the survey and review the questions included in that specific template before making your choice.
Types of Popular Templates to choose from
When it comes to creating surveys, Zonka Feedback offers a wide range of survey templates to choose from. Each template is designed to cater to different types of businesses and industries, ensuring that you find the perfect fit for your needs.
Whether you're conducting customer satisfaction surveys, employee feedback surveys, or market research surveys, Zonka Feedback has got you covered. With their user-friendly interface, you can easily create surveys that are tailored to your specific requirements.
- Net Promoter Score (NPS) Survey Template
- Customer Satisfaction (CSAT) Survey Template
- Customer Effort Score (CES) Survey Template
- Product Experience Survey Template
- Offline, Mobile & Kiosk Survey Template
- Website Feedback Template
- Smiley-faced Survey Template
In addition to these, you can also choose templates that best fit your industry or use case requirements. From the left side, you can choose from various Templates available based on Industry and Use Cases like:
- Hospitality & Travel Survey Templates
- Healthcare Survey Templates
- HR Survey Templates
- Retail and eCommerce Feedback Templates
There are over 100 survey templates that you can choose from when you decide to create online surveys with Zonka Feedback. When you choose any of the templates available in the library, you will be redirected to the chosen template. You can preview the survey and review the questions included in that specific template before making your choice.
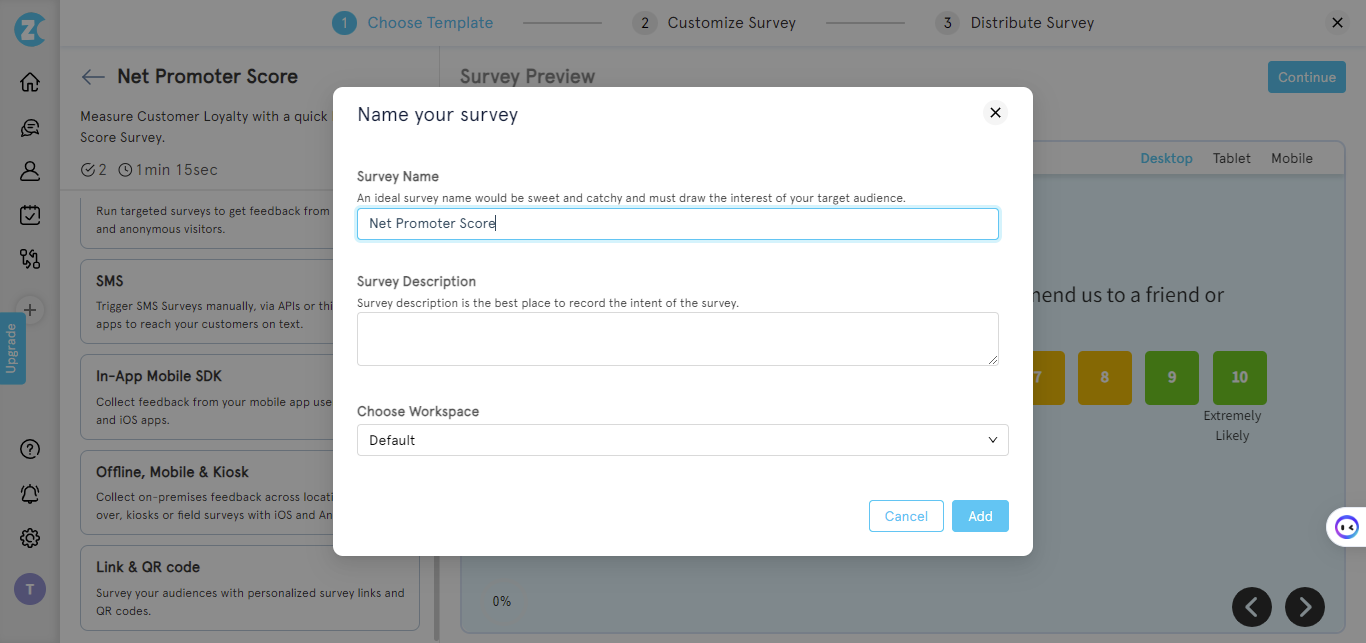
A pop-up will appear with two text fields (Survey Name and Survey Description) to enter details about the Survey you're creating. Enter the name of the Survey you'd like to keep and provide an optional description. Once you've entered the information, click 'Add' to select the template and begin editing.
b. Creating a Survey From Scratch
For those seeking complete customization, starting a survey from scratch is the way to go. Click on "Add Survey" and opt for the ‘Start from Scratch’ option located at the top right corner. This option provides a blank slate with no pre-added questions or predefined look and feel.
You will have the same popup window to add your survey name, survey description, and choose the required workspace for your survey.
Once you've added the details, you'll be redirected to the second step- where you can choose the survey question that you want to include.
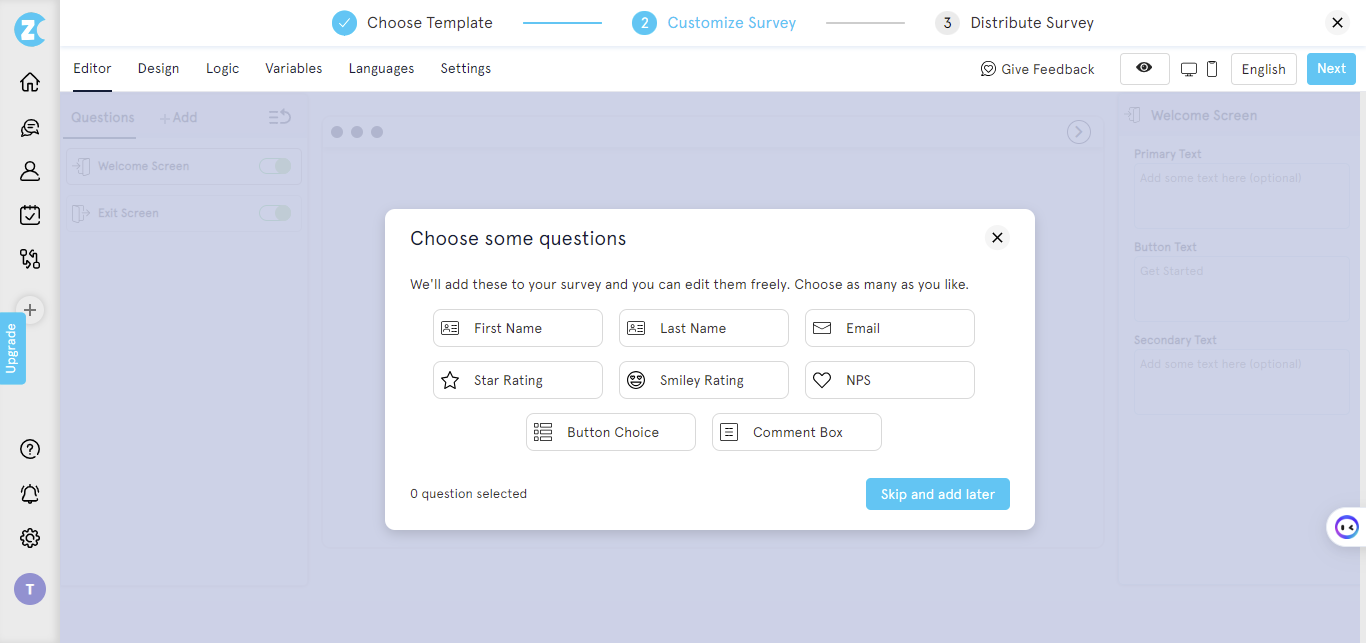
Popular Survey Question Types
There are over 30+ question types offered by Zonka Feedback, allowing you to gather valuable insights from your customers in a variety of ways. From multiple-choice questions to matrix questions or other closed-ended questions to open-ended questions and text boxes for comments, you have a wide range of options to choose from. Here are some of the popular question types you can choose:
- Text Box
- NPS Survey Question
- Checkbox Question
- Multiline Text Box/Comment Box
- Likert Scale Survey Question
- Dropdown Question
- Radio Button Question
- 5-Star Survey Question for CSAT Surveys
- Smiley Face Survey Questions
There are countless options to choose from and create a survey from scratch. Once you have selected the survey, you can simply click on Create a Survey and start customizing.
Either you can choose from these surveys or you can simply choose to skip and add later to start from a completely blank canvas for creating a survey with Zonka Feedback.
Step 2: Customizing your Survey in the Survey Builder
Creating a survey with a perfect look and feel, and all the right questions is very important – from the background image to font color to company branding, survey logic, language, and more.
In the Zonka Feedback Survey Builder, you can manage all this and more with absolutely no coding involved.
There's a number of features you can explore in this free online survey maker. However, for advanced features like logic, redirects, location-based surveys, etc., you would need to upgrade your plan to the paid version.
- Design your Survey
- Adding Logic to your Survey
- Viewing, Creating, and Managing Variables
- Selecting & Updating Multiple Survey Languages
- Manage Settings for your Surveys
Here are the different things that you can do in this step of creating your surveys.
1. Create & Edit Surveys on the Survey Editor
The Survey Editor is where you can add, modify and view all the questions in your survey. In Zonka Feedback's free survey maker, you can create and edit your surveys with ease.
There are 3 sections in the Survey Editor.
- Question Panel: On the left side, is the questions panel where you can view all your survey screens and questions, including Welcome Screen, Exit Screen, and all questions.
- Survey Preview: From the top-right corner, you can preview the survey as you edit it.
- Question Editor: On the right side, you can edit the screens and questions in your survey.
a. Adding a new Survey Question
The types of questions you ask in your survey can prove to be one of the most essential factors determining the success of a survey. As one of the best survey tools, we have over 30+ question types to choose from.
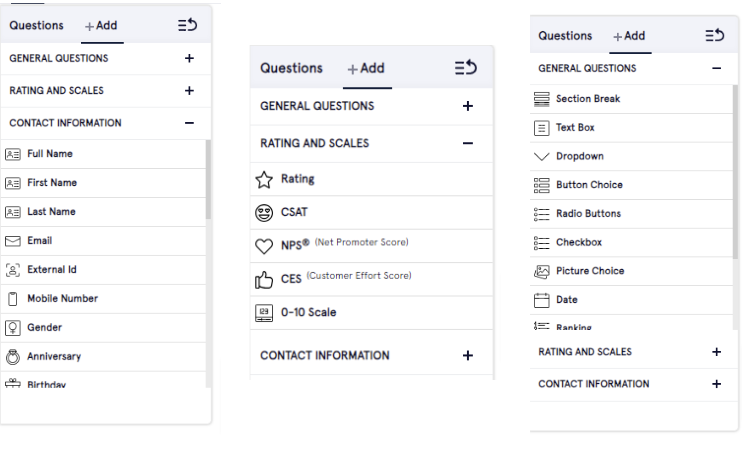
To add a new Survey Question, click on '+ Add'. Once done, you will see three categories and a list of questions to choose from.
These Categories and Questions are:
- General Questions: These are all the general questions you can include in your survey. These include: Section Break, Text Box (Comments), Dropdown, Button Choice, Radio Buttons, Checkboxes, Picture Choice, Date, Ranking, Legal Terms, Image Capture and Team Name.
- Rating and Scales: These include all rating questions, including CX Metrics like Net Promoter Score, Customer Effort Score, Customer Satisfaction Score Question. It also includes Rating Scales (choose from 2-5 rating scales), and 0-10 Rating Scale.
- Contact Information: Choose from the Contact Information Survey Question fields to capture data about contacts like Name, Email, Phone Number, External ID, Gender, Country, Language, Time Zone, Anniversary, Birthday. All Contact Attributes will also be available here to be included as Survey Questions in your Survey.
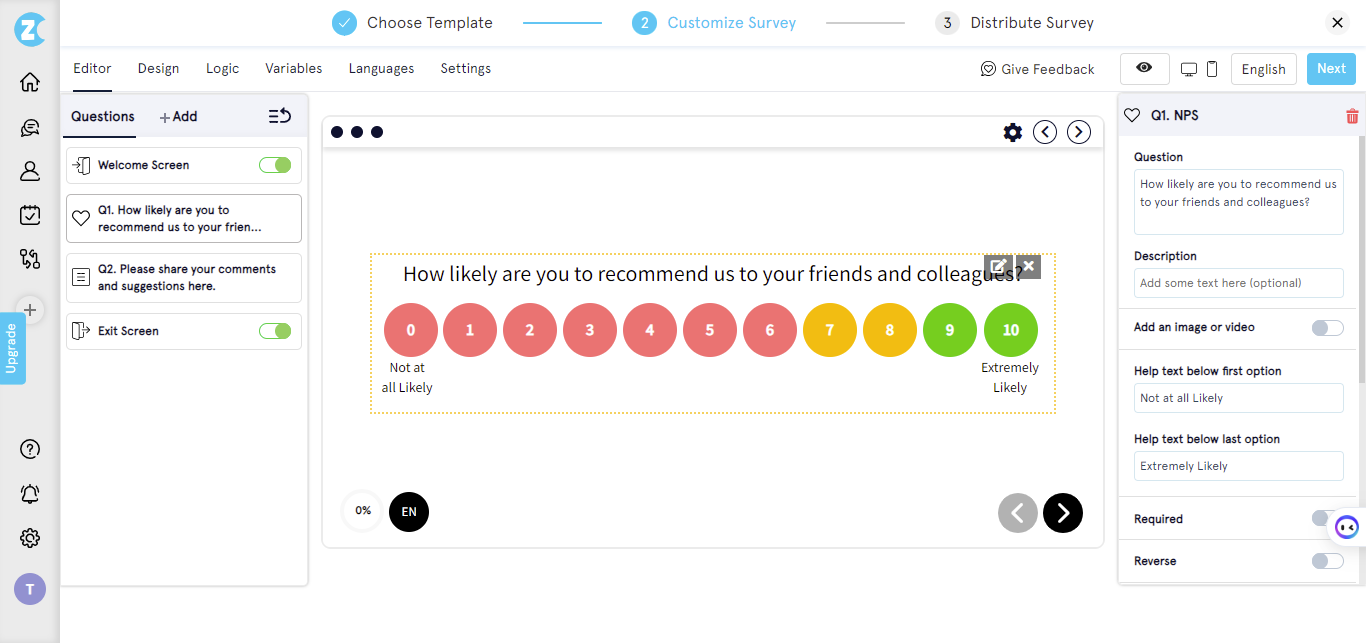
b. Edit Survey Questions
Once you have added a Survey Question, you can edit it by clicking on the question from the left Question panel. All the editing options for the related question will be visible on the right panel.
In all questions, you can edit:
- Question:This is the question heading
- Description: You can add a description to the question
- Add an image or video: You can include an image or video with your question to engage your audience.
- Required: This is a toggle to choose whether the question is mandatory or not
- Advanced Settings: Advanced Settings options like setting Variable, choosing to Hide question if Variable value is passed, Validation and Validation Message.
Besides these, different questions have different settings that can be edited.
c. Add Multiple Survey Questions in a screen
By default, you can add a single question per screen in your Zonka Feedback Surveys. So when you add a new question format, automatically a new screen gets created and the question is added in the new screen.
However, you can very easily add multiple survey questions in a particular screen as well.
To add multiple choices for survey questions in a screen, follow these steps:
- Select your survey, click on Build from the top navigation.
- Go to the Screen where you'd like to add multiple questions.
- Click on 'Enable adding multiple questions' checkbox on the top of the Survey Preview in the center
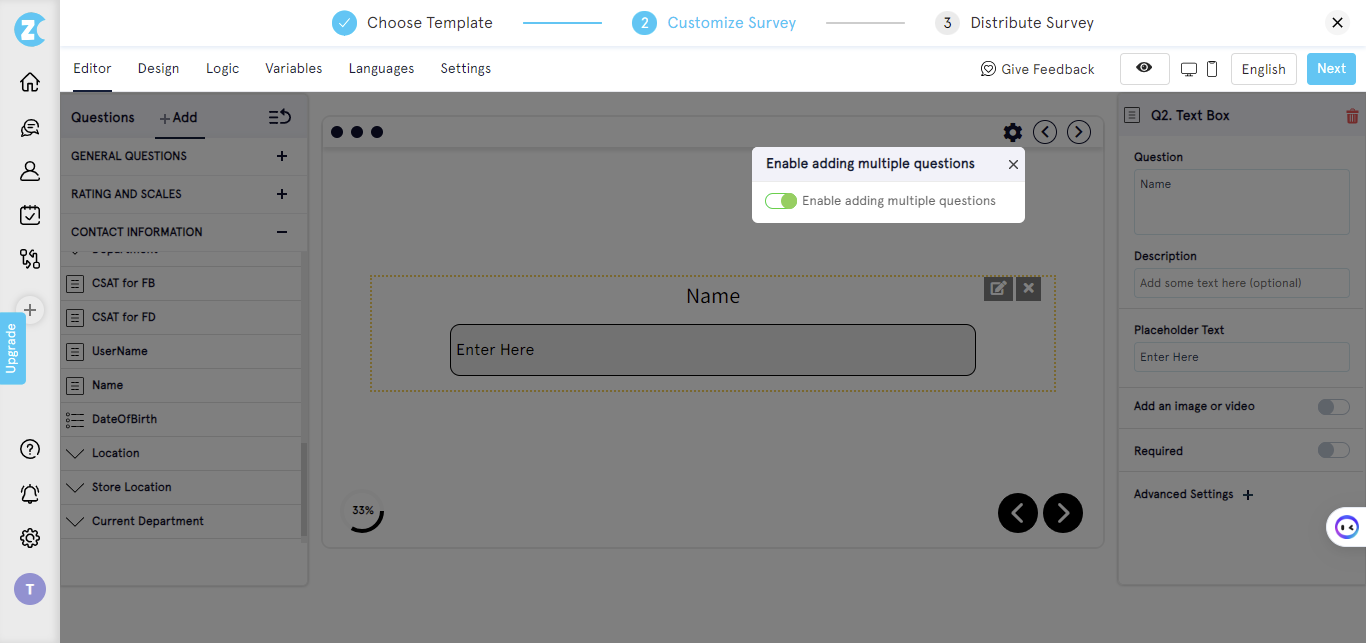
- Now, click on '+ Add' to add a new Survey Question. It would automatically be added in this screen.
You can add as many questions as you like in multiple-question survey screens in this online survey maker. You can have multiple screens with multiple questions.
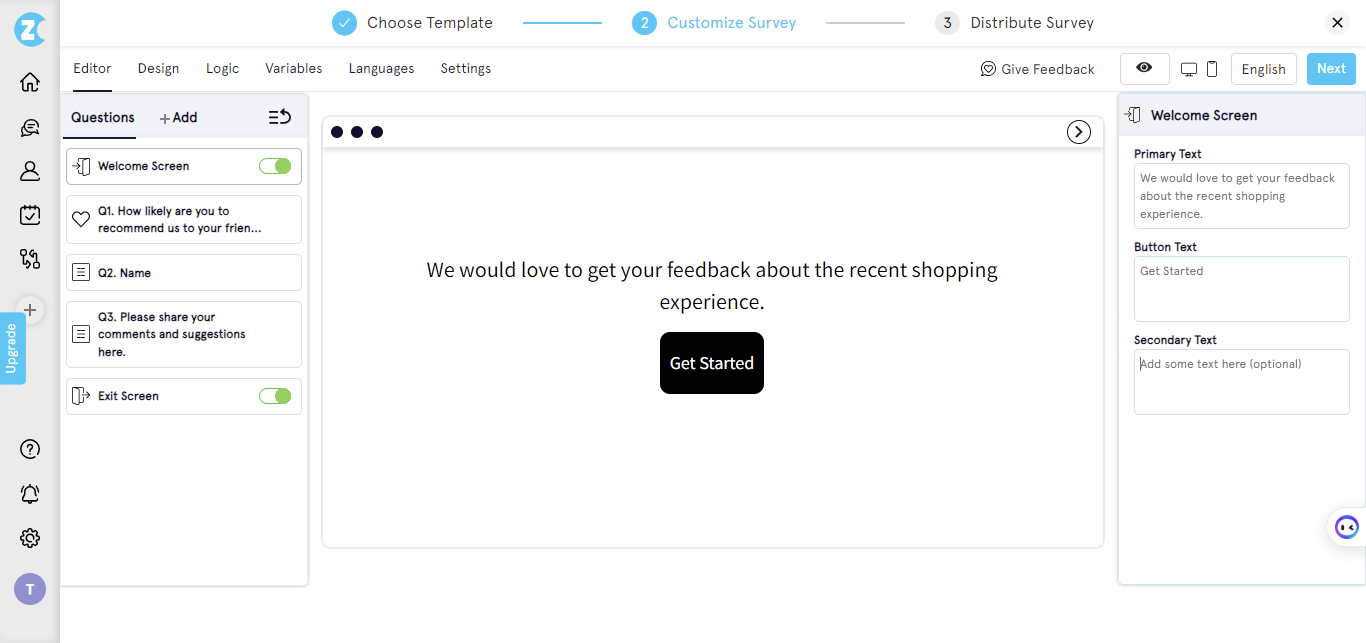
d. Manage Welcome Screen
Welcome Screen is usually the first screen that your customers would see when they access your survey. It should be impressive, should instantly make respondents relate to your brand and should contain information about the survey that they're about to take.
In the Survey Editor, you can edit the Welcome Screen, as well as Enable / Disable the Welcome Screen, if you'd like to show or hide it in a particular survey.
To edit the text on the Welcome Screen, follow these steps:
- Select your survey and click on Build from the top navigation.
- Choose Welcome Screen from the Question Panel on the left.
- The editor box will appear on the right side where you can:
- Edit Primary Text (appears above the Start Button)
- Edit Start Button Text
- Edit Secondary Text (appears below the Start Button)
Note: You can edit the Design and Look & Feel of the Welcome Screen from the Design section.
e. Manage Exit Screen
Exit Screen is the last screen that customers would see when they finish the survey. It should thank the respondent for their time and also provide any other information you'd like to leave the respondent with.
In the Survey Editor, you can edit the Exit Screen, as well as Enable / Disable the Exit Screen, if you'd like to show or hide it in a particular survey.
To edit the text on Exit Screen, follow these steps:
- Select your survey, click on Build from the top navigation.
- Choose Exit Screen from the Question Panel on the left
- The editor box will appear on the right side where you can:
- Edit Primary Text (appears on the top section)
- Edit Secondary Text (appears on the bottom section)
Note: You can edit the Design and Look & Feel of the Exit Screen from the Design section.
f. Manage Pre-capture Screen
Pre-Capture Screen is a part of the Offline Surveys (Face to face Surveys) that can be turned on from the Survey Settings. In this screen, you can include questions that you'd like your team members to fill out, instead of customers.
For instance, bill number, customer ID, team member name who was attending, and like.
- Pre-Capture Screen is only visible in Devices and not in Web Surveys.
- Pre-Capture Screen always appears before the Welcome Screen and is ideally to be filled out by the team member before handing over the Device to the Respondent.
- Multiple questions can be added from the Question Bank in the Pre-Capture Screen
2. Design your Surveys
The look and feel of your Surveys have a huge impact on your Survey Responses. While designing the survey, it is important to make sure that the surveys represent your brand and company values, as well as look attractive and pleasing.
To edit the look and feel of your Surveys, go to 'Design' from the top navigation in your Survey Editor.
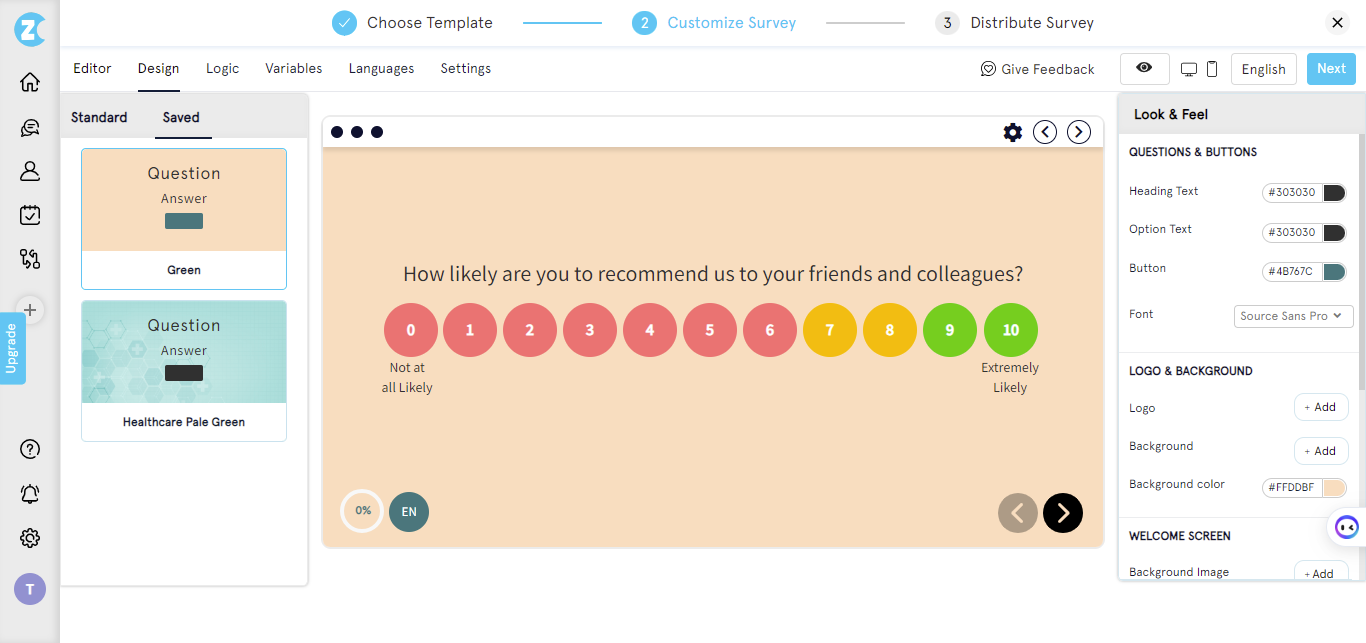
The Survey Design Editor has 3 sections. These are:
- Survey Themes: On the left side, you will see the Survey Themes listed as ‘Standard’. Choose from pre-set themes in your Survey or customize the Look & Feel and Save your own Themes.
- Survey Preview: From the top right corner, you can see the preview of your Survey and how it looks with the Survey Theme.
- Look & Feel: Edit the look and feel of your Questions & Buttons, Logo & Background, Welcome Screen, Language Screen, and Exit Screen.
a. Choose a Survey Theme
Zonka Feedback has pre-built Survey Themes to choose for your Survey. To pick from a pre-built theme, do as follows:
- Go to 'Design' in the Survey Editor.
- Browse through the Survey Themes available on the left side from the Standard section.
- Click on any theme to implement it in your survey.
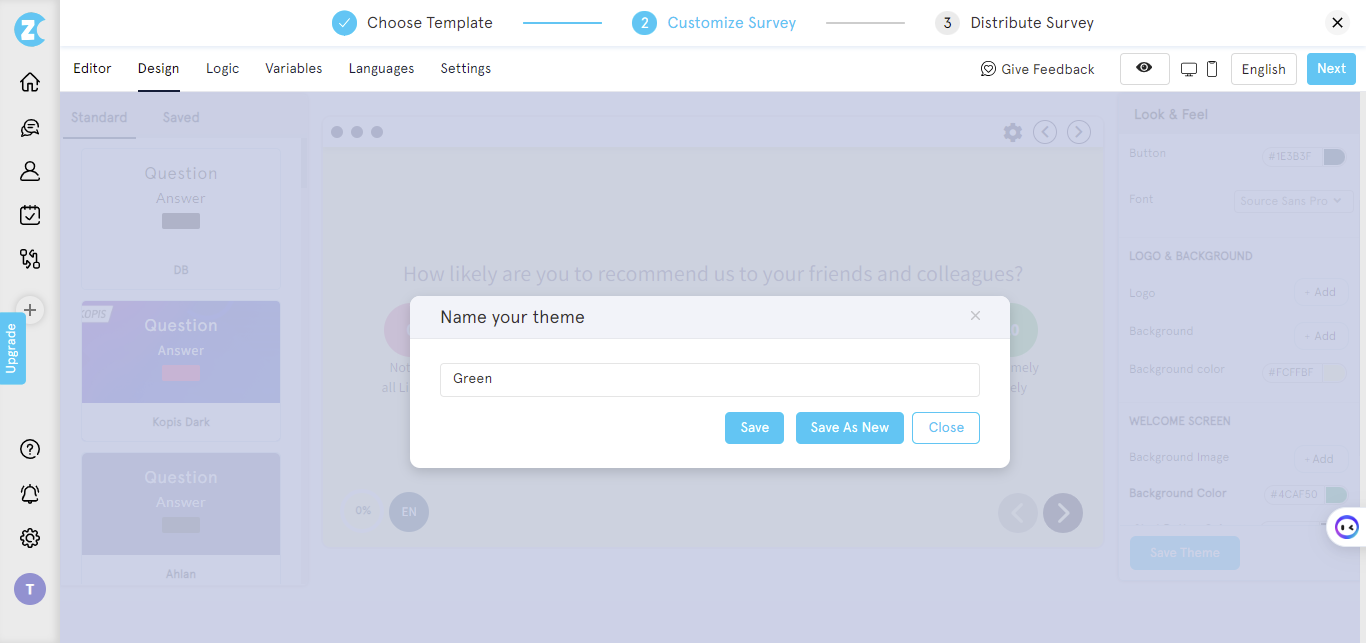
b. Creating your own Survey Theme
Creating your own Survey Theme is very helpful if you're going to create multiple surveys and want to have a ready-to-use Survey Theme that represents your brand, including your brand colors, background, logo, font free, and more.
You can create multiple Survey Themes and access them under the 'Saved' section in your Survey Design Editor.
To create your Survey Theme, do as follows:
- Go to 'Design' in the Survey Editor.
- Edit the Look & Feel of your Survey from the right panel
- Once done, click on 'Save Theme'.
- A pop up will appear to pick a name for your Theme. Add a name and click on 'Save' or 'Save as new'.
(If you click on Save, the theme you're currently on will get overwritten. If you click on Save as new, a new theme will be added.)
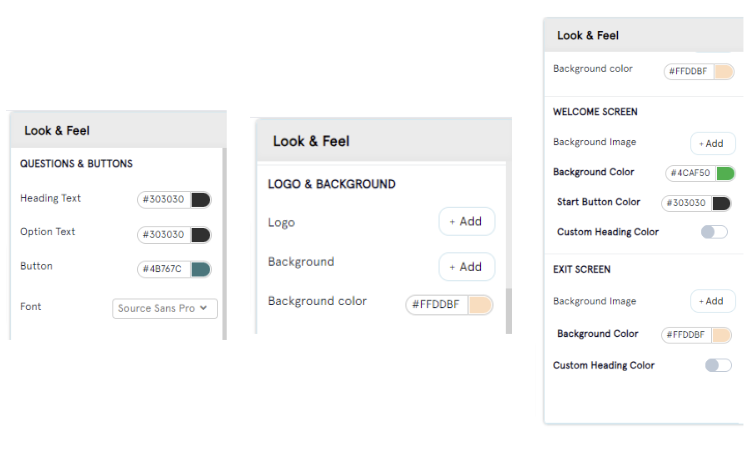
c. Editing Look & Feel of your Survey Screens
You can edit the Look & Feel of your Survey Screens from the Survey Design Editor. Here's all that you can edit from the Look & Feel section:
- Question & Buttons
- Heading Text Color
- Option Text Color
- Button Color
- Font Style
- Logo & Background
- Logo for Survey Screens
- Background for Survey Screens
- Background Color for Survey Screens
- Welcome Screen
- Logo for Welcome Screen
- Background for Welcome Screen
- Background Color for Welcome Screen
- Start Button Color
- Custom Heading Color
- Exit Screen
- Logo for Exit Screen
- Background for Exit Screen
- Background Color for Exit Screen
- Start Button Color
- Custom Heading Color
Learn more about Editing Survey Theme and how you can add a logo, background, and font to your survey.
e. Preview your Survey Look & Feel
From the top right corner, you can see the preview of your Survey and how it looks with the Survey Theme.
3. Adding Survey Logic to your Surveys
With Survey Logic, you can create engaging and intelligent surveys and ask relevant questions to your Survey respondents.
You can add logic to different questions in your Zonka Feedback Survey and create a survey flow for different responses.

To add Logic to Survey Questions, do as follows:
- Select your survey, click on Build from the top navigation.
- Go to 'Logic' from the top navigation in the Survey Builder
- All the Survey Questions will be listed here along with their Screen.
- Click on '+ Add Logic' for the question you'd like to add Logic for
- Follow the steps
- Select Choice
- Select Event
- Select Action
- Select Question
- Once done, click the 'Save Logic’ button to complete the setup.
Zonka Feedback has two types of Survey Logics - Skip Logic and Hide Survey. In Skip Logic, you can skip to a particular question based on choices selected. In Hide Logic, you can hide one of the screens in your survey based on the choices selected.
Learn more about Survey Logic and why you should add Survey Logic in your Surveys.
4. Viewing, Editing, Survey Variables
Survey Variables allow you pass additional data and information with your Surveys to display pre-filled data in your survey, as well as to enrich your Survey Reports with data. Survey Variables also allow you to personalize your surveys.
Survey Variables are helpful in scenarios where you have pieces of data and information related to the Survey Respondent, and/or their experience that you would like to include in your Responses and Reports, but don't need the Respondent to fill out.
This helps in saving time, and enriching your reports with valuable data that helps you analyse your reports better.
There are three types of Variables you can access and create in your Zonka Feedback surveys.
- Survey Variables: Survey Variables are variables related to the survey and include all Survey Questions, Survey Language, and Location. You can hide or display the value passed question as per your preference. Some examples for Survey Variables include Order Number, Order Items.
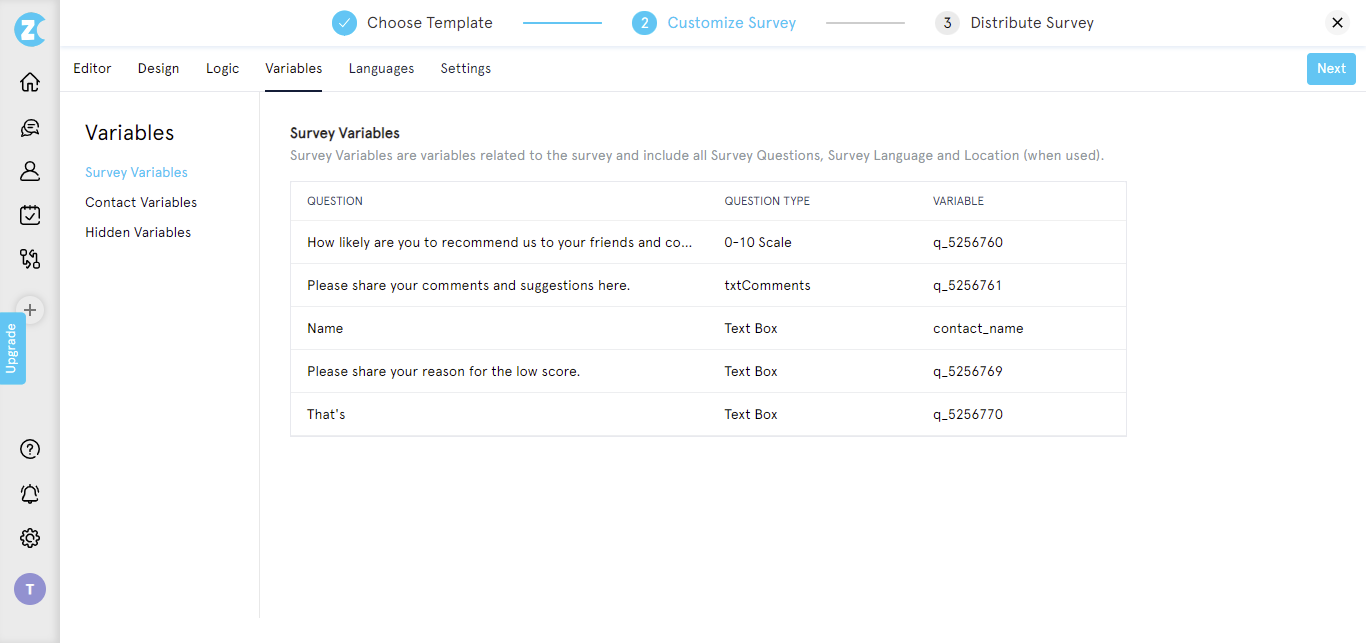
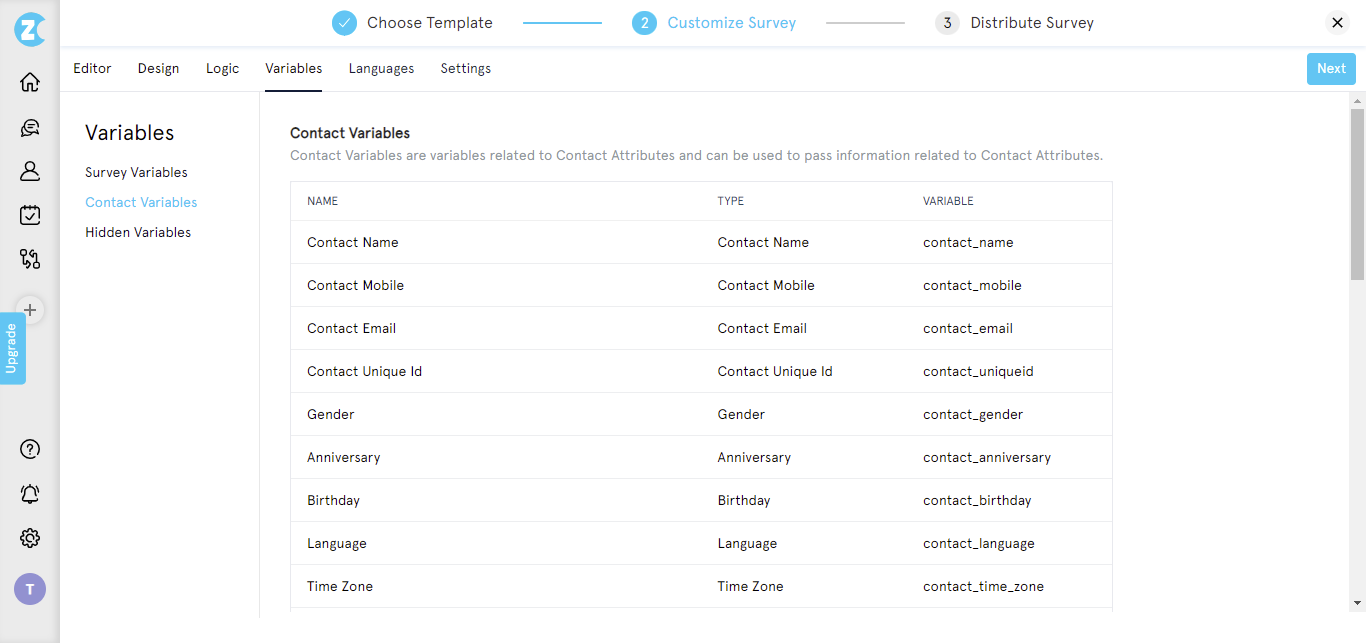
- Contact Variables: Contact Variables are variables related to Contact Attributes and can be used to pass information related to Contacts. You can hide or display the value passed question as per your preference. These include Contact Name, Email Address, Phone Number, Gender, Country, Time Zone, and any other Contact Attributes that you have created in your account. These are permanent pieces of information that would be saved with the Contact and also available in Survey Responses and Reports.
- Hidden Variables: Hidden Variables include information and data that you want to pass in your survey response without adding Survey Question or Contact Attributes. This would include Coupon Code, Flight Number, Order Number and so on.
5. Selecting & Updating Multiple Survey Languages
In Zonka Feedback's online survey tool, by default, all new Surveys you create are in the English Language. You can add more languages to your Survey or create a Survey in a different language and remove English from it completely.
The following languages are currently supported by Zonka Feedback. If you're looking for more languages, we can definitely look into it. Contact us at hello@zonkafeedback.com for the same.
|
Afrikaans |
Arabic |
Azerbaijani |
|
Bengali |
Burmese |
Canadian French |
|
Cantonese |
Chinese (Simplified) |
Chinese (Traditional) |
|
Cymraeg |
Czech |
Danish |
|
Dutch |
English (Default) |
Finnish |
|
French |
Gaeilge |
German |
|
Gujarati |
Haitian Creole |
Hebrew |
|
Hindi |
Hungarian |
Indonesian |
|
Italian |
Japanese |
Kannada |
|
Korean |
Malay |
Malayalam |
|
Marathi |
Norwegian |
Odia |
|
Polish |
Portuguese (European) |
Portuguese (Brazilian) |
|
Punjabi |
Romanian |
Russian |
|
Spanish (European) |
Spanish (Latin) |
Swedish |
|
Tamil |
Telugu |
Thai |
|
Turkish |
Vietnamese |
To add Language to your Survey, follow these steps.
- Navigate to Surveys and open the survey to which you'd like to add languages.
- Go to Build in the top navigation to edit the Survey in the Survey Builder.
- Go to 'Languages' from the top navigation within the Survey Builder
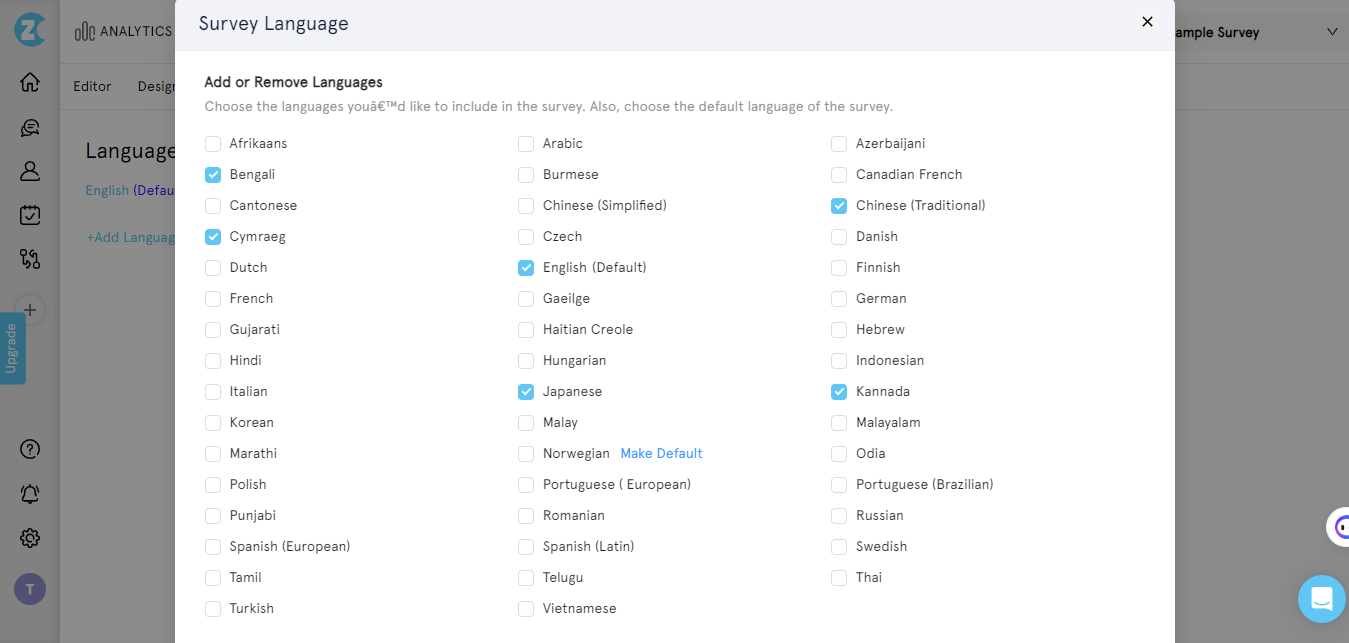
- Click on the “+Add Language’ option and select the languages you'd like to add to your Survey.
- Once done, click on ‘Save’.
- Then, you can click on the selected language and manually add translations to all the questions in your survey.
Note: When you add a new language, all the language translations of the Default Language get copied in the new language and can be edited anytime. The Language Translations don't take place automatically and have to be added by you manually.
To know more about our Multilingual feature in Zonka, please refer to our help article Multilingual Surveys in Zonka Feedback.
6. Manage Setting for your Surveys
In Zonka Feedback, you have the option to change or modify your survey functionalities with the help of our Survey Settings feature. To modify the survey settings, follow the below steps,
- After selecting your survey, click on Build from the top navigation.
- Go to 'Settings' from the top navigation in the Survey Builder.
- Choose from the different settings available from the left panel.
Settings available in Zonka Feedback are as follows.
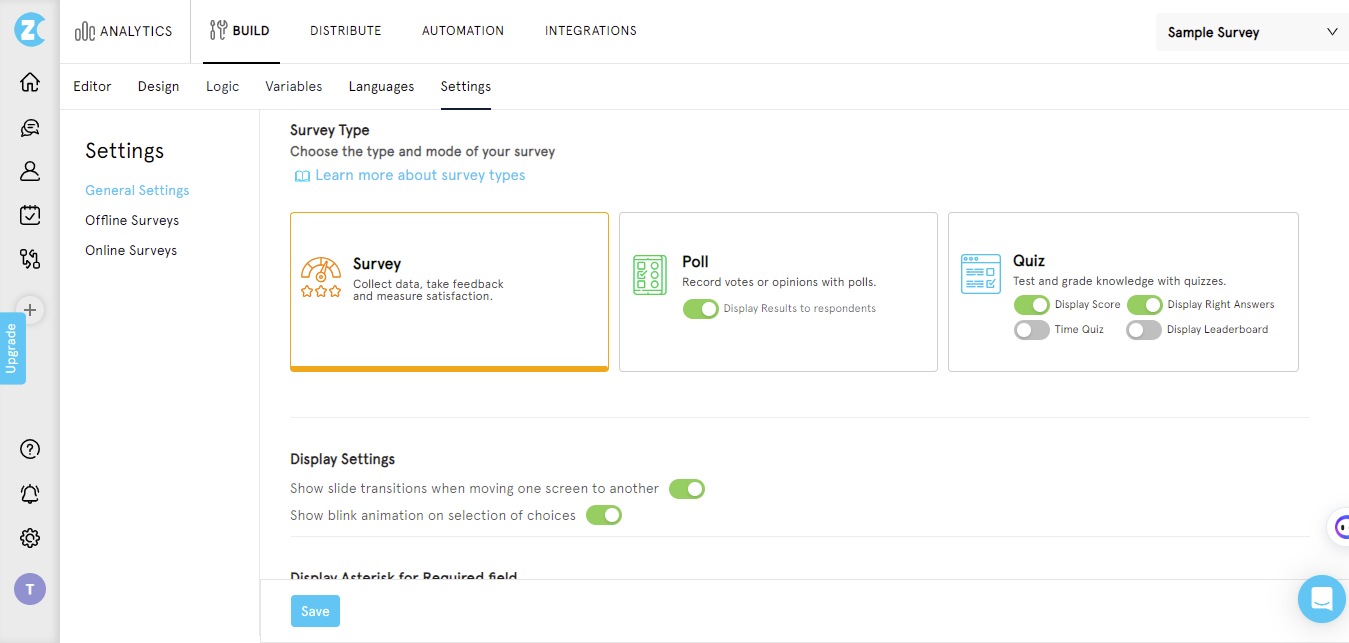
a. General Settings
Set your Survey Name, Survey ID, and Survey Questions orientation, Allow Partial Submission, and track your Google Analytics over here.
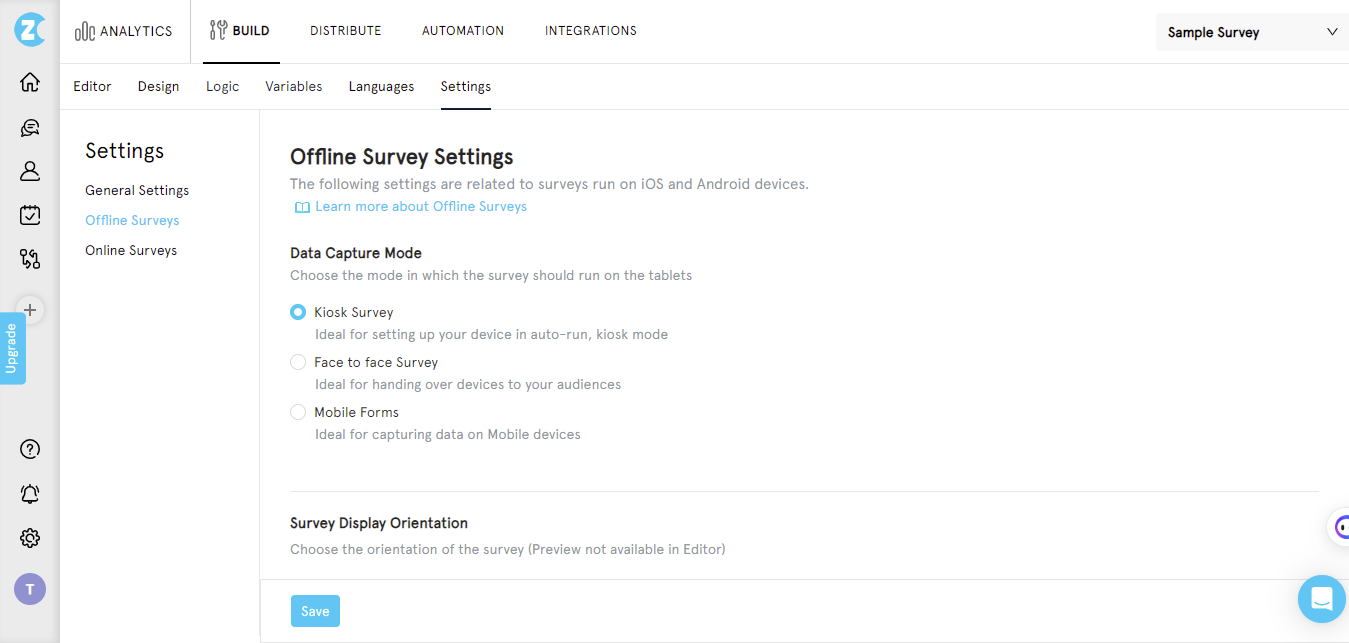
b. Offline Survey Settings
For all iOS and Android Device users, this is one place to configure all your device activities.
- You can choose your preferred data capture mode (Kiosk, face-to-face, Mobile forms).
- Survey Display Orientation (Portrait and Landscape).
- Set your survey Inactivity time-out between 0 to 99 secs.
- Set your survey restart time between 0 to 99 secs.
- Choose your preferred survey exit options
- Set your exit password.
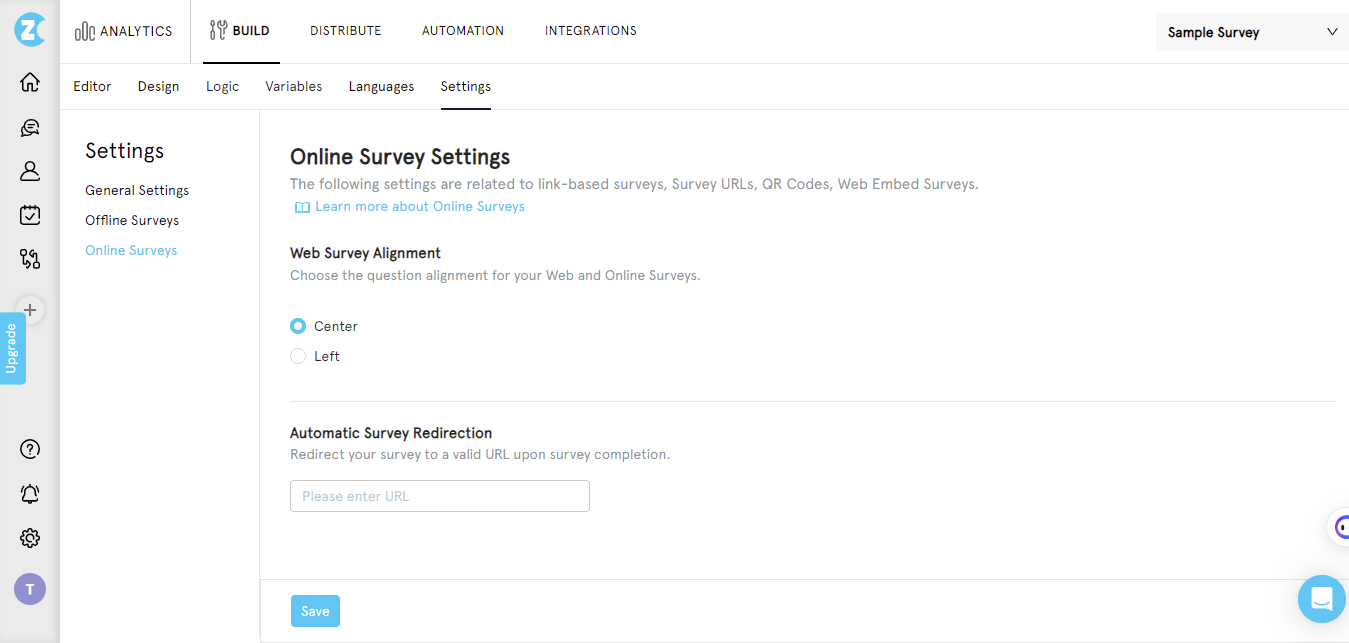
c. Online Surveys
In this, you get the option to set up the survey when you are looking to capture the feedback data in online mode. The following options,
- Web Survey Layout: Here you can choose the web view and layout for this survey. The options.
- Centre Aligned: Choose this option if you want to align the question in the center of the screen when the respondent opens up the survey online.
- Left Aligned: Choose this option if you want to align the question on the left-hand side of the screen when the respondent opens up the survey online.
- Redirect Survey: Here you can choose the URL (the web page link) where you would like to redirect the respondent after he/she has completed the survey. You can define the time frame in which the respondent will be re-directed to that URL.
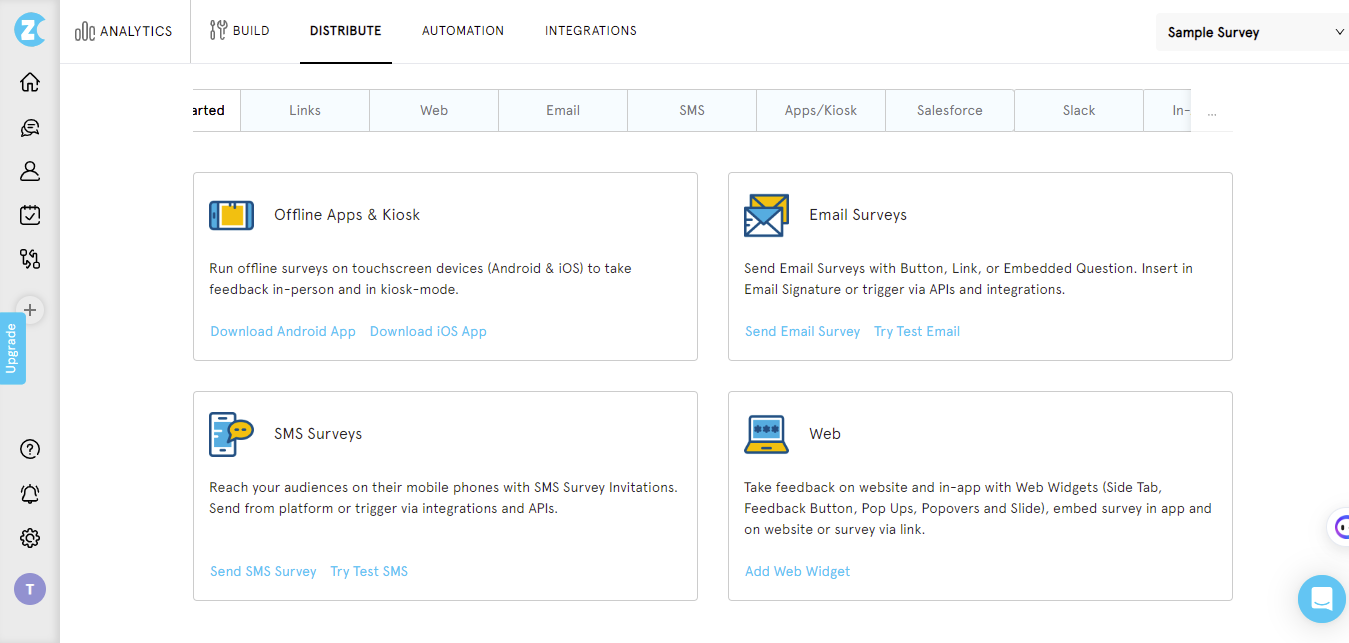
Step 3: Distributing your Survey
With Zonka Feedback, you can start collecting feedback and responses on emails, SMS, Mobiles and tablets, QR codes, Web links, Websites, in-products, Slack, Microsoft Teams, all major Customer Relationship Management tools, Enterprise-Related products, and Helpdesk systems.
Here are the steps you can follow to distribute your survey to your target audience.
- Send Email Survey invitations, email signature surveys, embedded surveys, and more to your customers using email survey tool.
- Trigger SMS Surveys to customers on their Mobile Devices via this SMS survey tools option of SMS and gather information, capture feedback, and measure customer experience.
- Conduct surveys on Mobile and Tablet Applications in Both Android and IOS Devices for on-the-go surveys, do market research, and take on-premises, in-moment feedback from target audience.
- You can collect data, and measure satisfaction at various online touch points on your Website and in your product application with the help of website surveys in form of pop up, pop over, side tab, bottom bars and slide outs.
- Integrate and collaborate with popular apps and reduce the time of your data syncing across different tools to manage your audience and business.
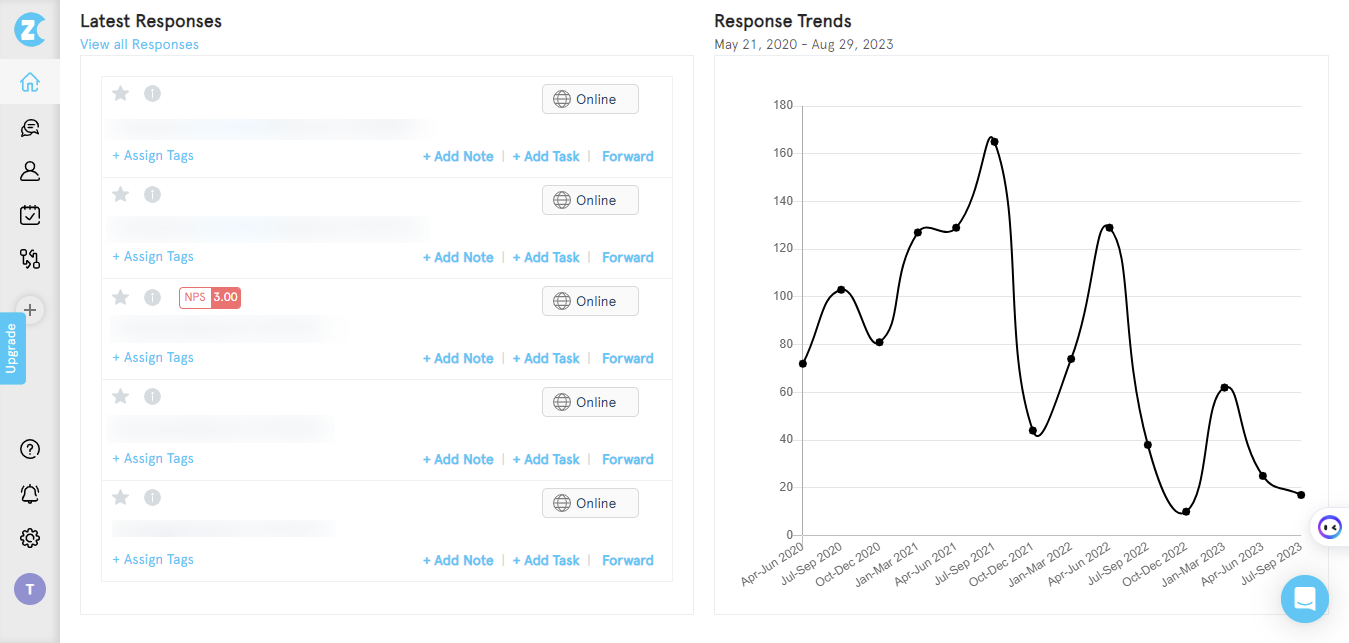
Step 4: What’s next? Let’s Analyze Responses
As responses come in, Zonka Feedback compiles the data into an easy-to-understand dashboard. It automatically organizes all the collected data and gives you robust reports, graphs, and tablets to extract meaningful insights.
- Now that you’re all set up with your survey, you may want to manage the responses and act on them. You can read through this article to know all the features of your Responses Inbox.
- Well when your response inbox gets too crowded, you may want to analyze them with our real-time reports and analytics based on response tags, CX metrics, and questions and identify trends and gaps.
- Don't want to manually go through each response and take action on it? Automate it with workflows, auto-responders, and auto-tagging features of Zonka Feedback.
Step 5: Close the Feedback Loop:
Once you have created your surveys, distributed them, and collected responses for analysis, the main goal is to take action and close the feedback loop. If it's a positive response, they should receive a thank you message, and for any negative feedback, there should be a process to assess the issues and make the effort to close the feedback loop.
Here is how you can do the same with Zonka Feedback:
Set up and automate Survey-based workflows and actions
- Design your Workflow: With a simple workflow designer, create filters and actions based on your Survey.
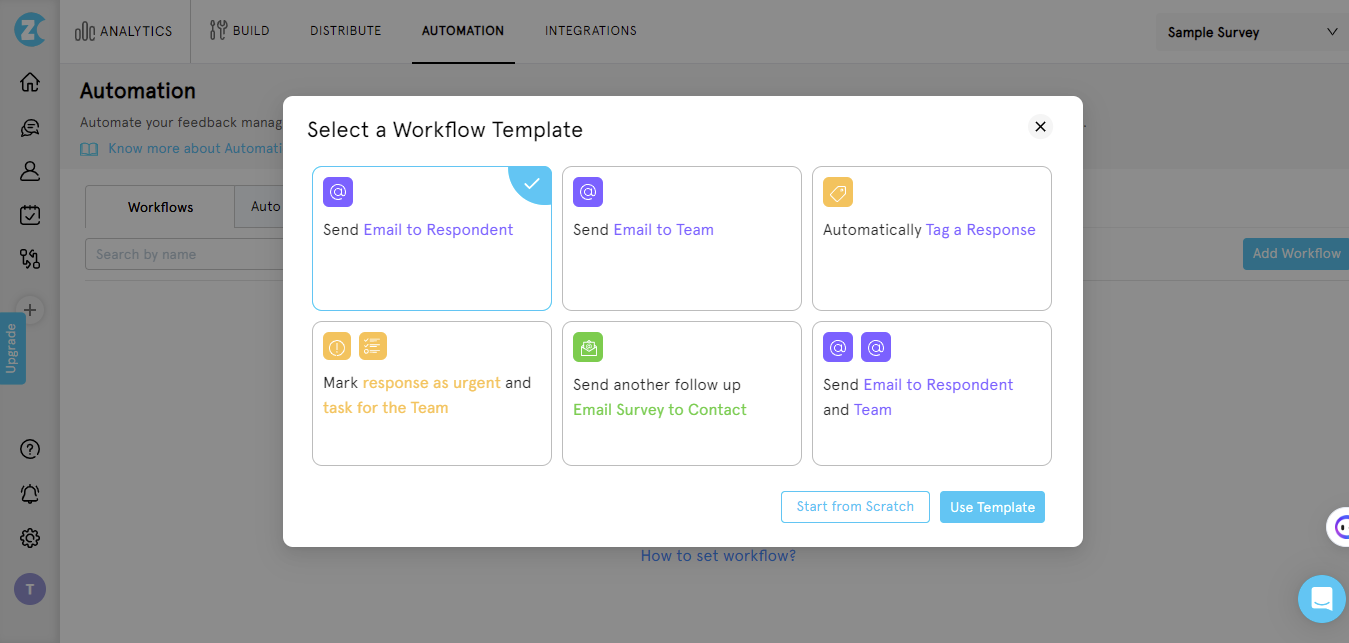
- Set up Alerts & Actions for customers and team: Set up alerts for the team for the high effort, trigger automated emails to customers, and add tasks for the team for quick issue resolution.
- Daily, Weekly, Monthly Digests: Schedule Daily, Weekly or Monthly Response Digests with a summary of all responses, and Customer Satisfaction Score trends.
- Saved and Scheduled Reports: Build your own Reports and save them for quick access. Schedule them to be delivered to your mailbox at regular intervals.
- Update Contacts based on the Score: Add Contacts to the list, unsubscribe them or send them another Survey based on their score.
Creating surveys in Zonka Feedback is a straightforward process that empowers businesses to gather valuable customer feedback and make data-driven decisions.
Whether you're conducting customer satisfaction surveys, employee engagement surveys, or asking market research questions, Zonka Feedback provides the survey tools and resources you need to create, distribute, and analyze surveys with ease.
Sign up now for a 14-day free trial or schedule a demo to understand how to create a survey with Zonka Feedback.